Jun 12, 2020

SMBleed: A New Critical Vulnerability Affects Windows SMB Protocol

Cybersecurity researchers today uncover a new critical vulnerability affecting the Server Message Block (SMB) protocol that could allow attackers to leak kernel memory remotely, and when combined with a previously disclosed "wormable" bug, the flaw can be exploited to achieve remote code execution attacks. Dubbed "SMBleed" (CVE-2020-1206) by cybersecurity firm ZecOps, the flaw resides in

via The Hacker News

Related posts


Jun 11, 2020

Top 5 Most Useful Linux Tools For Programmers

Top 5 most useful linux tools for Programmer

Linux is a free and open-source software operating systems built around the Linux kernel. It typically packaged in a form known as a Linux distribution for both desktop and server use. It is a great development environment for programmers and developers. However, without the development tools, that would be impossible. Fortunately, plenty of Linux tools are available. Here are the top 5 most useful Linux tools for programmers.

Also Read;-  How To Clone One Android To Another

5 Most Useful Linux tools for Programmers

1. VIM

vim editor-compressed
VIM is a free and open source software written by Bram Moolenaar in 1991. It is designed for use both from a command-line interface and as a standalone application in a graphical user interface. It comes standard with almost every Linux distribution and is also known as "the programmer's editor". VIM is great for coding and can also be used for editing things like configuration files and XML documents.
Vim has been developed to be a cross-platform that supports many other platforms. In 2006, it was voted as the most popular editor amongst Linux Journal readers. In 2015, Stack Overflow developer survey found it to be the third most popular text editor while in 2016, the Stack Overflow developer survey found it to be the fourth most popular development environment.
Read more;-  How To Use WhatsApp without Mobile No

2. Zsh

Zsh is written in C and initially released in 1990. It is a Unix shell that can be used as an interactive login shell and as a powerful command interpreter for shell scripting. Zsh is an extended version of Bourne shell (BASH) with a large number of improvements, including some features of Bash, ksh, and tcsh. Zsh gives a user-friendly experience on the command line. It also gives better auto-completion, Vim key bindings, and smart guesses when you write a command wrong.
Its features include (but not limited to):
  • Programmable command-line completion,
  • Sharing of command history among all running shells
  • Extended file globbing
  • Improved variable/array handling
  • Editing of multi-line commands in a single buffer
  • Spelling correction
  • Various compatibility modes,
  • Themeable prompts, and
  • Loadable modules.

3. Byobu

It was initially released in 2009 written in Sh and Python. Byobu can be used to provide on-screen notification or status and tabbed multi-window management. Thus, it is intended to improve terminal sessions when users connect to remote servers with an operating system Linux and Unix-like. It is is an enhancement for the GNU Screen terminal multiplexer or tmux used with the GNU/Linux computer operating system.

4. GIT

git commandsGit was initially released on April 7, 2005. It is a version control system to track changes in computer files and to coordinate work on those files among multiple people. It is primarily used for source code management in software development and can be used to keep track of changes in any set of files available in the English language. It is aimed at speed, data integrity, and support for distributed, non-linear workflows. It is free and open source software distributed under the terms of the GNU General Public License version 2.
Moreover, Linus Torvalds was the creator of GIT for the development of the Linux kernel. On the other hand, its current maintainer since then is Junio Hamano. Thus, every Git directory on every computer is a full-fledged repository with complete history and full version tracking abilities, independent of network access or a central server.

5. Docker

Written by Solomon Hykes in 2013, it is a computer program that performs operating-system-level virtualization, the containerization, which is developed by Docker, Inc. Primarily, Docker was developed for Linux to use as the resource isolation features of the Linux kernel. It is a tool that can package an application and its dependencies in a virtual container that can run on any Linux server. This helps enable the flexibility and portability on where the application can run, whether on premises, public cloud, private cloud, bare metal, etc.  Moreover, it accesses the Linux kernel's virtualization features either directly using the libcontainer library.

Read more


  1. Hacking With Linux
  2. Pentest Linux
  3. Hacking To The Gate
  4. Hackerrank Sql
  5. Pentest Linux
  6. Hacking Attack
  7. Hacker Keyboard
  8. Pentest Free
  9. Pentest Documentation
  10. Pentest Red Team
  11. Pentest Wiki
  12. Pentest Training
  13. Pentesting
  14. Hacking Youtube
  15. Hacking Games

Top Process Related Commands In Linux Distributions


Commands in Linux are just the keys to explore and close the Linux. As you can do things manually by simple clicking over the programs just like windows to open an applications. But if you don't have any idea about commands of Linux and definitely you also don't know about the Linux terminal. You cannot explore Linux deeply. Because terminal is the brain of the Linux and you can do everything by using Linux terminal in any Linux distribution. So, if you wanna work over the Linux distro then you should know about the commands as well. In this blog you will exactly get the content about Linux processes commands which are are given below.

ps

The "ps" command is used in Linux to display your currently active processes over the Linux based system. It will give you all the detail of the processes which are active on the system.

ps aux|grep

The "ps aux|grep" command is used in Linux distributions to find all the process id of particular process like if you wanna know about all the process ids related to telnet process then you just have to type a simple command like "ps aux|grep 'telnet'". This command will give you the details about telnet processes.

pmap

The "pmap" command in Linux operating system will display the map of processes running over the memory in Linux based system.

top

The "top" command is used in Linux operating system to display all the running processes over the system's background. It will display all the processes with process id (pid) by which you can easily kill/end the process.

Kill pid

Basically the kill command is used to kill or end the process or processes by simply giving the process id to the kill command and it will end the process or processes. Just type kill and gave the particular process id or different process ids by putting the space in between all of them. kill 456 567 5673 etc.

killall proc

The "killall proc" is the command used in Linux operating system to kill all the processes named proc in the system. Killall command just require a parameter as name which is common in some of the processes in the system.

bg

The "bg" is the command used in Linux distributions to resume suspended jobs without bringing them to foreground.

fg

The "fg" command is used in Linux operating system to brings the most recent job to foreground. The fg command also requires parameters to do some actions like "fg n" n is as a parameter to fg command that brings job n to the foreground.
Related articles

  1. How To Pentest A Website With Kali
  2. Hacker Google
  3. Hacker Videos
  4. Hacking Games Online
  5. Pentestmonkey
  6. How To Pentest A Website With Kali
  7. Pentest Example Report
  8. Hacker News
  9. Hacking Games Online
  10. Hacking

WHO IS ETHICAL HACKER

Who is hacker?
A hacker is a Creative person and a creative Programmer,who have knowledge about Networking,Operating system,hacking & a best creative social engineer who control anyone's mind he is also a knowledgeable person.
Hacker are the problem solver and tool builder.

                                OR

A hacker is an individual who uses computer, networking and other skills to overcome a technical problem but it often refers to a person who uses his or her abilities to gain unauthorized access to system or networks in  order to commit crimes. 


More articles

Rootkit Umbreon / Umreon - X86, ARM Samples


Pokémon-themed Umbreon Linux Rootkit Hits x86, ARM Systems
Research: Trend Micro


There are two packages
one is 'found in the wild' full and a set of hashes from Trend Micro (all but one file are already in the full package)


Download

Download Email me if you need the password  


File information

Part one (full package)

#File NameHash ValueFile Size (on Disk)Duplicate?
1.umbreon-ascii0B880E0F447CD5B6A8D295EFE40AFA376085 bytes (5.94 KiB)
2autoroot1C5FAEEC3D8C50FAC589CD0ADD0765C7281 bytes (281 bytes)
3CHANGELOGA1502129706BA19667F128B44D19DC3C11 bytes (11 bytes)
4cli.shC846143BDA087783B3DC6C244C2707DC5682 bytes (5.55 KiB)
5hideportsD41D8CD98F00B204E9800998ECF8427E0 bytes ( bytes)Yes, of file promptlog
6install.sh9DE30162E7A8F0279E19C2C30280FFF85634 bytes (5.5 KiB)
7Makefile0F5B1E70ADC867DD3A22CA62644007E5797 bytes (797 bytes)
8portchecker006D162A0D0AA294C85214963A3D3145113 bytes (113 bytes)
9promptlogD41D8CD98F00B204E9800998ECF8427E0 bytes ( bytes)
10readlink.c42FC7D7E2F9147AB3C18B0C4316AD3D81357 bytes (1.33 KiB)
11ReadMe.txtB7172B364BF5FB8B5C30FF528F6C51252244 bytes (2.19 KiB)
12setup694FFF4D2623CA7BB8270F5124493F37332 bytes (332 bytes)
13spytty.sh0AB776FA8A0FBED2EF26C9933C32E97C1011 bytes (1011 bytes)Yes, of file spytty.sh
14umbreon.c91706EF9717176DBB59A0F77FE95241C1007 bytes (1007 bytes)
15access.c7C0A86A27B322E63C3C29121788998B8713 bytes (713 bytes)
16audit.cA2B2812C80C93C9375BFB0D7BFCEFD5B1434 bytes (1.4 KiB)
17chown.cFF9B679C7AB3F57CFBBB852A13A350B22870 bytes (2.8 KiB)
18config.h980DEE60956A916AFC9D2997043D4887967 bytes (967 bytes)
19config.h.dist980DEE60956A916AFC9D2997043D4887967 bytes (967 bytes)Yes, of file config.h
20dirs.c46B20CC7DA2BDB9ECE65E36A4F987ABC3639 bytes (3.55 KiB)
21dlsym.c796DA079CC7E4BD7F6293136604DC07B4088 bytes (3.99 KiB)
22exec.c1935ED453FB83A0A538224AFAAC71B214033 bytes (3.94 KiB)
23getpath.h588603EF387EB617668B00EAFDAEA393183 bytes (183 bytes)
24getprocname.hF5781A9E267ED849FD4D2F5F3DFB8077805 bytes (805 bytes)
25includes.hF4797AE4B2D5B3B252E0456020F58E59629 bytes (629 bytes)
26kill.cC4BD132FC2FFBC84EA5103ABE6DC023D555 bytes (555 bytes)
27links.c898D73E1AC14DE657316F084AADA58A02274 bytes (2.22 KiB)
28local-door.c76FC3E9E2758BAF48E1E9B442DB98BF8501 bytes (501 bytes)
29lpcap.hEA6822B23FE02041BE506ED1A182E5CB1690 bytes (1.65 KiB)
30maps.c9BCD90BEA8D9F9F6270CF2017F9974E21100 bytes (1.07 KiB)
31misc.h1F9FCC5D84633931CDD77B32DB1D50D02728 bytes (2.66 KiB)
32netstat.c00CF3F7E7EA92E7A954282021DD72DC41113 bytes (1.09 KiB)
33open.cF7EE88A523AD2477FF8EC17C9DCD7C028594 bytes (8.39 KiB)
34pam.c7A947FDC0264947B2D293E1F4D69684A2010 bytes (1.96 KiB)
35pam_private.h2C60F925842CEB42FFD639E7C763C7B012480 bytes (12.19 KiB)
36pam_vprompt.c017FB0F736A0BC65431A25E1A9D393FE3826 bytes (3.74 KiB)
37passwd.cA0D183BBE86D05E3782B5B24E2C964132364 bytes (2.31 KiB)
38pcap.cFF911CA192B111BD0D9368AFACA03C461295 bytes (1.26 KiB)
39procstat.c7B14E97649CD767C256D4CD6E4F8D452398 bytes (398 bytes)
40procstatus.c72ED74C03F4FAB0C1B801687BE200F063303 bytes (3.23 KiB)
41readwrite.cC068ED372DEAF8E87D0133EAC0A274A82710 bytes (2.65 KiB)
42rename.cC36BE9C01FEADE2EF4D5EA03BD2B3C05535 bytes (535 bytes)
43setgid.c5C023259F2C244193BDA394E2C0B8313667 bytes (667 bytes)
44sha256.h003D805D919B4EC621B800C6C239BAE0545 bytes (545 bytes)
45socket.c348AEF06AFA259BFC4E943715DB5A00B579 bytes (579 bytes)
46stat.cE510EE1F78BD349E02F47A7EB001B0E37627 bytes (7.45 KiB)
47syslog.c7CD3273E09A6C08451DD598A0F18B5701497 bytes (1.46 KiB)
48umbreon.hF76CAC6D564DEACFC6319FA167375BA54316 bytes (4.21 KiB)
49unhide-funcs.c1A9F62B04319DA84EF71A1B091434C644729 bytes (4.62 KiB)
50cryptpass.py2EA92D6EC59D85474ED7A91C8518E7EC192 bytes (192 bytes)
51environment.sh70F467FE218E128258D7356B7CE328F11086 bytes (1.06 KiB)
52espeon-connect.shA574C885C450FCA048E79AD6937FED2E247 bytes (247 bytes)
53espeon-shell9EEF7E7E3C1BEE2F8591A088244BE0CB2167 bytes (2.12 KiB)
54espeon.c499FF5CF81C2624B0C3B0B7E9C6D980D14899 bytes (14.55 KiB)
55listen.sh69DA525AEA227BE9E4B8D59ACFF4D717209 bytes (209 bytes)
56spytty.sh0AB776FA8A0FBED2EF26C9933C32E97C1011 bytes (1011 bytes)
57ssh-hidden.shAE54F343FE974302F0D31776B72D0987127 bytes (127 bytes)
58unfuck.c457B6E90C7FA42A7C46D464FBF1D68E2384 bytes (384 bytes)
59unhide-self.pyB982597CEB7274617F286CA80864F499986 bytes (986 bytes)
60listen.shF5BD197F34E3D0BD8EA28B182CCE7270233 bytes (233 bytes)

part 2 (those listed in the Trend Micro article)
#File NameHash ValueFile Size (on Disk)
1015a84eb1d18beb310e7aeeceab8b84776078935c45924b3a10aa884a93e28acA47E38464754289C0F4A55ED7BB556489375 bytes (9.16 KiB)
20751cf716ea9bc18e78eb2a82cc9ea0cac73d70a7a74c91740c95312c8a9d53aF9BA2429EAE5471ACDE820102C5B81597512 bytes (7.34 KiB)
30a4d5ffb1407d409a55f1aed5c5286d4f31fe17bc99eabff64aa1498c5482a5f0AB776FA8A0FBED2EF26C9933C32E97C1011 bytes (1011 bytes)
40ce8c09bb6ce433fb8b388c369d7491953cf9bb5426a7bee752150118616d8ffB982597CEB7274617F286CA80864F499986 bytes (986 bytes)
5122417853c1eb1868e429cacc499ef75cfc018b87da87b1f61bff53e9b8e86709EEF7E7E3C1BEE2F8591A088244BE0CB2167 bytes (2.12 KiB)
6409c90ecd56e9abcb9f290063ec7783ecbe125c321af3f8ba5dcbde6e15ac64aB4746BB5E697F23A5842ABCAED36C9146149 bytes (6 KiB)
74fc4b5dab105e03f03ba3ec301bab9e2d37f17a431dee7f2e5a8dfadcca4c234D0D97899131C29B3EC9AE89A6D49A23E65160 bytes (63.63 KiB)
88752d16e32a611763eee97da6528734751153ac1699c4693c84b6e9e4fb08784E7E82D29DFB1FC484ED277C70218781855564 bytes (54.26 KiB)
9991179b6ba7d4aeabdf463118e4a2984276401368f4ab842ad8a5b8b730885222B1863ACDC0068ED5D50590CF792DF057664 bytes (7.48 KiB)
10a378b85f8f41de164832d27ebf7006370c1fb8eda23bb09a3586ed29b5dbdddfA977F68C59040E40A822C384D1CEDEB6176 bytes (176 bytes)
11aa24deb830a2b1aa694e580c5efb24f979d6c5d861b56354a6acb1ad0cf9809bDF320ED7EE6CCF9F979AEFE451877FFC26 bytes (26 bytes)
12acfb014304b6f2cff00c668a9a2a3a9cbb6f24db6d074a8914dd69b43afa452584D552B5D22E40BDA23E6587B1BC532D6852 bytes (6.69 KiB)
13c80d19f6f3372f4cc6e75ae1af54e8727b54b51aaf2794fedd3a1aa463140480087DD79515D37F7ADA78FF5793A42B7B11184 bytes (10.92 KiB)
14e9bce46584acbf59a779d1565687964991d7033d63c06bddabcfc4375c5f1853BBEB18C0C3E038747C78FCAB3E0444E371940 bytes (70.25 KiB)

Related articles


  1. Hacker Keyboard
  2. Pentest Tools Free
  3. Pentest Open Source
  4. Pentestmonkey Sql Injection
  5. Hacker Google
  6. Pentest Software

Jun 10, 2020

RapidScan: The Multi-Tool Website Vulnerabilities Scanner With Artificial Intelligence

RapidScan's Features:
  • One-step installation.
  • Executes a multitude of security scanning tools, does other custom coded checks and prints the results spontaneously.
  • Come of the tools include nmap, dnsrecon, wafw00f, uniscan, sslyze, fierce, lbd, theharvester, dnswalk, golismero etc executes under one entity.
  • Saves a lot of time, indeed a lot time!
  • Checks for same vulnerabilities with multiple tools to help you zero-in on false positives effectively.
  • Legends to help you understand which tests may take longer time, so you can Ctrl+C to skip if needed.
  • Association with OWASP Top 10 2017 on the list of vulnerabilities discovered. (under development)
  • Critical, high, large, low and informational classification of vulnerabilities.
  • Vulnerability definitions guides you what the vulnerability actually is and the threat it can pose
  • Remediations tells you how to plug/fix the found vulnerability.
  • Executive summary gives you an overall context of the scan performed with critical, high, low and informational issues discovered. (under development)
  • Artificial intelligence to deploy tools automatically depending upon the issues found. for eg; automates the launch of wpscan and plecost tools when a wordpress installation is found. (under development)
  • Detailed comprehensive report in a portable document format (*.pdf) with complete details of the scans and tools used. (under development)

For Your Infomation about RapidScan:
  • Program is still under development, works and currently supports 80 vulnerability tests.
  • Parallel processing is not yet implemented, may be coded as more tests gets introduced.

RapidScan supports checking for these vulnerabilities:
  • DNS/HTTP Load Balancers & Web Application Firewalls. 
  • Checks for Joomla, WordPress and Drupal
  • SSL related Vulnerabilities (HEARTBLEED, FREAK, POODLE, CCS Injection, LOGJAM, OCSP Stapling).
  • Commonly Opened Ports.
  • DNS Zone Transfers using multiple tools (Fierce, DNSWalk, DNSRecon, DNSEnum).
  • Sub-Domains Brute Forcing.
  • Open Directory/File Brute Forcing.
  • Shallow XSS, SQLi and BSQLi Banners.
  • Slow-Loris DoS Attack, LFI (Local File Inclusion), RFI (Remote File Inclusion) & RCE (Remote Code Execution).

RapidScan's Requirements:
  • Kali Linux, Parrot Security OS, BlackArch... Linux distros that based for pentesters and hackers.
  • Python 2.7.x

RapidScan Installation:


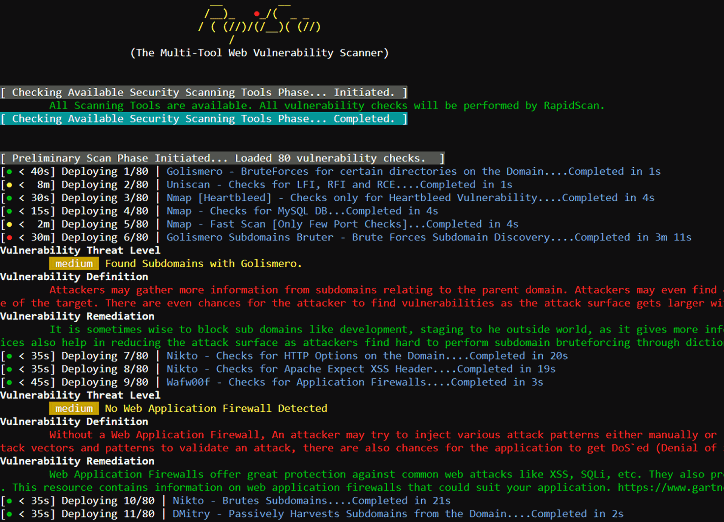
RapidScan's screenshots:
RapidScan helping menu
RapidScan Intro
RapidScan Outro

How to contribute?
If you want to contribute to the author. Read this.

Related links

Setting Up A Burp Development Environment

This quick blog post will document getting started with developing Burp extensions using java. Burp provides interfaces for developers to hook into the Burp application and extend the application or integrate with other tools, this interface is documented on the following site - http://portswigger.net/burp/extender/

For this guide you will need the following items:


After downloading and opening up Eclipse you will need to create a new java project. This can be done by clicking "File->New Java Project". Fill in a project name and click finish.

Once the project has been created you will need to create a new package called "burp". This can be done by right clicking the "src" folder under your new project and selecting "New->Package". When the dialog comes up set the "Name" as "burp":

You should now have a package named "burp" under the source folder in the right pane. Now you will need to import the Burp extender classes into your project. Download all of the extender classes to a local folder, once this is done right click on the "burp" package in your project and select "Import". On the dialog window that comes up select "General->File System" and hit "next":

On the next dialog you will need to navigate to where you downloaded the Burp extender classes to. Once you have done this you should see the classes, click on the folder to select all items and click "Finish":

Next we can add the Burp application into the project. To do this click on "Project->Properties" on the top toolbar. When the dialog opens select "Java Build Path" and then the "Libraries" tab. On this dialog click "Add External JARs..."
Navigate to where ever you have Burp downloaded to and select it. After you have done this click "OK" to dismiss the dialog. You are now ready to build your own Burp extensions. You can test your environment by creating a new class in the burp package named "BurpExtender". Right click the "burp" package and click "New->Class". On the dialog that comes up enter "BurpExtender" and click "Finish":

In the "BurpExtender" class you can enter the following:


package burp;


public class BurpExtender
{
    public void registerExtenderCallbacks(IBurpExtenderCallbacks callbacks)
    {
        callbacks.registerMenuItem("Hello World.", new CustomMenuItem());
    }
}


class CustomMenuItem implements IMenuItemHandler
{
    public void menuItemClicked(String menuItemCaption, IHttpRequestResponse[] messageInfo)
    {
        try
        {
            System.out.println("Hello From Burp!");
            System.out.println("Request Item Details");
            System.out.println("Host: " + messageInfo[0].getHost());
            System.out.println("URL: " + messageInfo[0].getUrl());


        }
        catch (Exception e)
        {
            e.printStackTrace();
        }
    }
}


After adding the content to your "BurpExtender" class you are ready to run the project for the first time. Click on "Run->Run" from the menu. You should see the following dialog asking how it should run your project:
Select "Java Application" and click "Ok". Next you should receive a dialog asking which application you want to run. Select "StartBurp - burp" and click "Ok":

You should now see the burp application running. Intercept a request in the application and right click on the request, you should now see an item in the menu named "Hello World."

When you click the "Hello World." menu button you should see some information about the request in your eclipse console window:

That's it, you now have setup your working development environment for building your own Burp extensions. The javadocs for the Burp Extender interfaces are available on the Extender web page:


Related news
  1. Pentest Plus
  2. Pentest Website
  3. Hacking Health
  4. Pentest Owasp Top 10
  5. Pentest Wordpress
  6. Hacking Google
  7. Hacking Games
  8. Hacking Site
  9. Pentest Software
  10. Hackerone
  11. Hacking Bluetooth
  12. Pentest Report
  13. Hacker Keyboard
  14. Hacking Images
  15. Hacking Quotes
  16. Hacker Kevin Mitnick